This guide provides instructions and solutions for one of the four Vaults on the Shores of Gold Tall Tale in Sea of Thieves. If you haven't begun this Tall Tale or made it to the Shores of Gold, you can find that link to that guide section below. In the list below, you can also find the links to every other guide for this Tall Tale, including the other Vaults and the Hidden Journals.
- Sea of Thieves | Shores of Gold Tall Tale | How to Find the Shores of Gold
- Sea of Thieves | Shores of Gold Tall Tale | North Vault Guide and Solutions
- Sea of Thieves | Shores of Gold Tall Tale | South Vault Guide and Solutions
- Sea of Thieves | Shores of Gold Tall Tale | West Vault Guide and Solutions
- Sea of Thieves | Shores of Gold Tall Tale | How to Find and Defeat the Gold Hoarder
- Sea of Thieves | Shores of Gold Tall Tale | Hidden Journal Locations
We strongly recommend looking for the Hidden Journals on this adventure, as they provide much greater insight into Briggsy, who is what we believe to be the main character in this whole questline.
Sea of Thieves | Shores of Gold Tall Tale | East Vault Guide & Solution
This guide section is broken into two parts. The first part (Option One) provides you with a spoiler-free guide on how to solve this Vault. The second part (Option Two) provides the exact solution for those who don't want to solve the puzzles themselves or are bound for time.
Option One: How to Get the East Vault Medallion
There aren't a lot of components to this Vault. Unlike the others, you don't need to explore outside the vault or use the Quest Book. Briggsy barely mentions this Vault in her notes and doesn't leave a clear hint on how to solve it. Before you activate this Vault, we recommend reading completely through this section, so you have a good idea of what you need to do.
Related: How to Get the Ritual Skull in Sea of Thieves - Pro Game Guides
The first thing you'll need to do is activate the Altar like almost every Vault you've had to solve on these adventures. Equip and light your Lantern, then use it to light the four braziers on the corners of the Altar. The room will begin to fill with water at a much faster pace than the other Vault rooms you've solved.
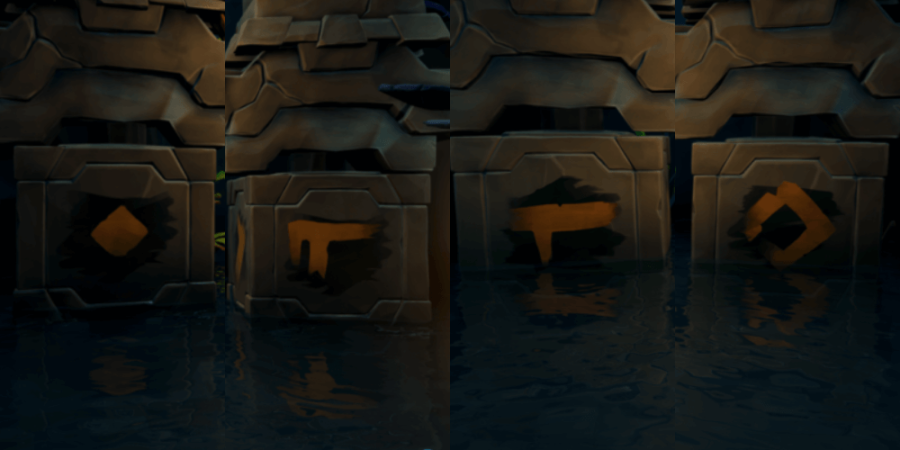
Everything you need to solve this Vault is at your disposal. You'll need to turn the pillars to the correct symbols and engage the Altar button in the center once you've done it. We're not going to give you the exact answer in this part, but we will provide you a few tips to remember.
- You don't need any items in your inventory. This includes your Quest Book and any special quest item you might have thus far. The solution to this Vault is in the room itself.
- Pay attention to the shapes of the symbols. The first time you'll have seen these symbols used to reference something is inside this Vault.
- Pay attention to your surroundings. Look around the room! You'll see the clue you need.
Option Two: Puzzle Solution
The symbols on the pillars represent sections of the Key hanging on the cloth on the wall. Each symbol is about one-fourth of the key. Start with the key's handle on the right, start turning pillars from right to left to look like the key. The last pillar symbol should look like the diamond you see at the tip of the key. Once you've set all four pillars, press the button on the Altar!

What's Next
There are other vaults to solve! The following links will provide you with the guides and solutions for the other three vaults: North, South, and West. Before you enter the Gold Hoarder's chamber, we recommend you start searching for the Hidden Journals! If you have found all four medallions, proceed to the guide on How to Find and Defeat the Gold Hoarder!
Need help fishing while you sail the seas? Check out our guide on How to Catch and Sell Fish!
